
Repairing a Kohler shower valve may seem like a daunting task, but with the right tools and guidance, it can be accomplished efficiently. Whether you’re dealing with a dripping faucet, inconsistent water temperature, or low water pressure, understanding the steps to fix the issue will save you both time and money.
This guide on how to repair a kohler shower valve will walk you through the process, ensuring your shower valve functions like new again.
Why Repair a Kohler Shower Valve?
Before we dive into the repair process, it’s important to understand why repairing your Kohler shower valve is necessary. Neglecting a faulty shower valve can lead to bigger problems down the line, such as water damage and increased utility bills. It’s also more cost-effective to repair a shower valve rather than replace it entirely.
You may also want to repair your Kohler shower valve for personal reasons, such as wanting to maintain the overall look and functionality of your bathroom. No matter the reason, it’s important to address any issues with your shower valve promptly.
Tools and Materials You Will Need
Before you begin repairing your Kohler shower valve, gather all the necessary tools and materials to ensure a smooth process. Here are some items you will need:
Flathead Screwdriver:
A flathead screwdriver will be used to remove the shower handle and trim.
Adjustable Wrench:
An adjustable wrench is essential for loosening and tightening bolts on the valve.
Allen Wrench:
You may need an allen wrench to remove certain parts of the shower valve.
Replacement Parts:
Be sure to have any necessary replacement parts on hand before starting your repair. This could include new O-rings,
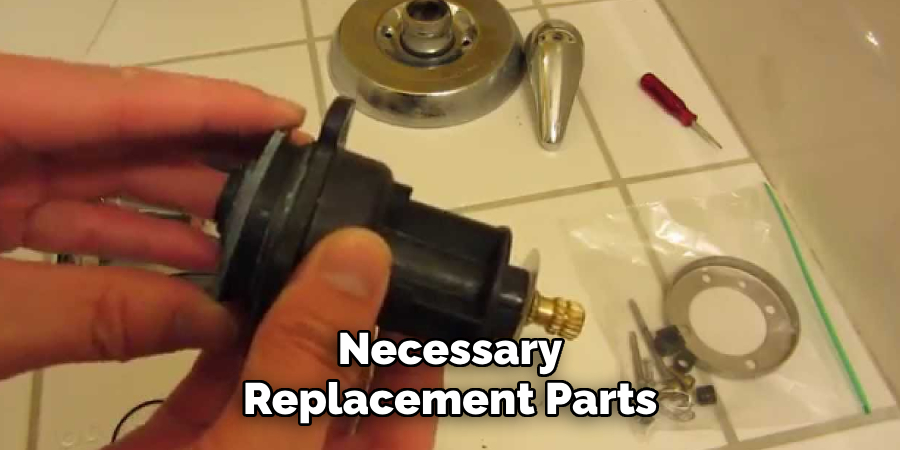
washers, or cartridges, depending on the issue with your shower valve. Contact Kohler customer service or consult your owner’s manual for assistance in determining which replacement parts you may need.
Plumbers Tape:
Plumber tape will help create a tight seal when reassembling the shower valve.
8 Step-by-step Instructions on How to Repair a Kohler Shower Valve
Step 1: Turn Off the Water Supply
The first step in repairing your Kohler shower valve is to turn off the water supply. Locate the main water shut-off valve in your home or the specific shut-off valve for the shower, if available. This will prevent water from flowing while you work, avoiding potential water damage or mess during the repair process.
Once the water is turned off, open the shower faucet to drain any remaining water from the pipes. This step ensures a safe and dry working environment before proceeding to the next steps.
Step 2: Remove the Shower Handle and Trim
Using a flathead screwdriver or an Allen wrench (depending on your shower’s design), carefully remove the screws that hold the shower handle in place. Start by prying off any decorative caps to access the screws underneath. Once the screws are visible, unscrew them gently and pull the handle away from the wall.
Next, remove the trim plate surrounding the valve. The trim plate is typically secured with screws, so use a screwdriver to take them out. Keep these screws in a safe place for reassembly later. Once the trim is removed, you’ll have clear access to the shower valve for further repair steps. Be cautious during this process to avoid damaging the handle or trim pieces.
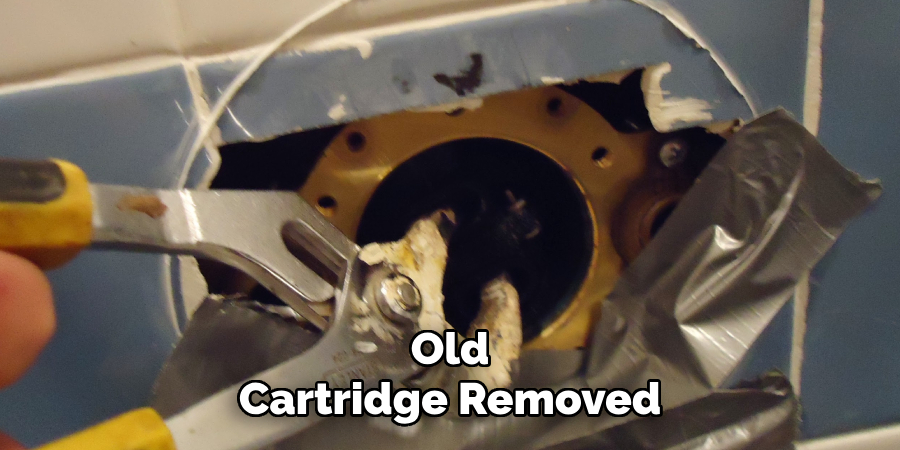
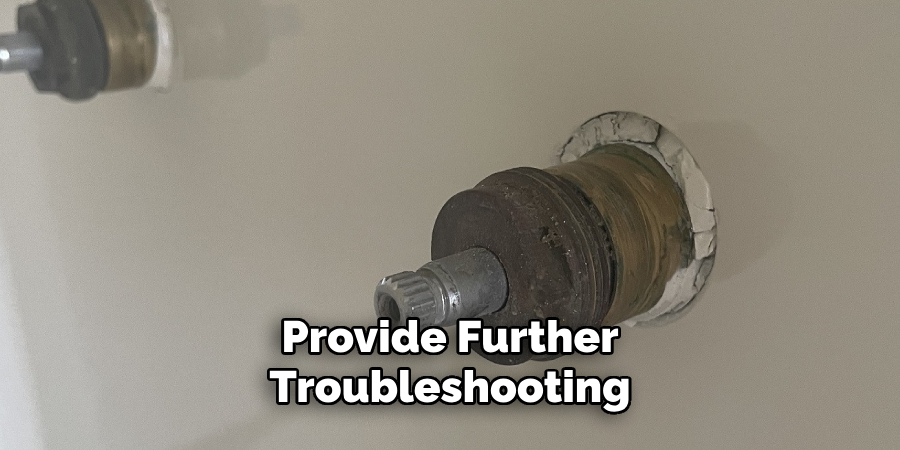
Step 3: Remove the Valve Cartridge
The valve cartridge is responsible for controlling the flow and temperature of water in your shower. If you’re experiencing issues with inconsistent water temperature or pressure, a faulty valve cartridge may be to blame. To remove it, locate the retaining nut holding the cartridge in place and use an adjustable wrench to loosen and remove it.
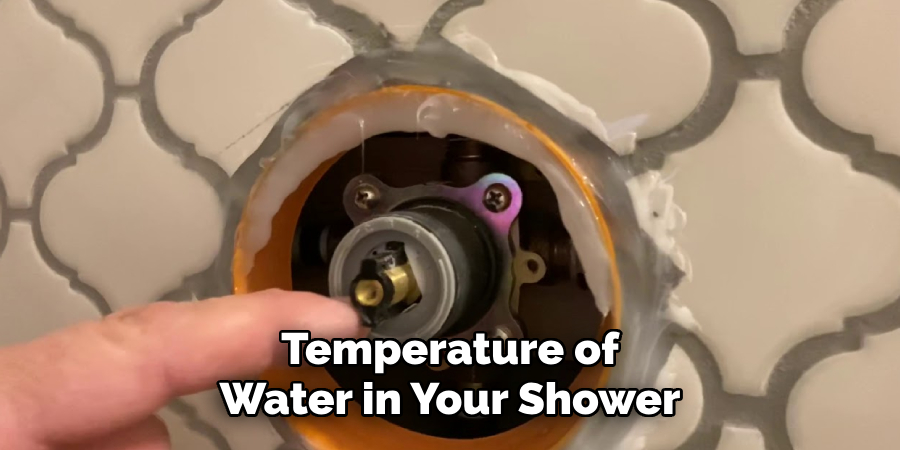
Next, carefully pull out the old cartridge using pliers or a specialized tool if necessary. Inspect the cartridge for any cracks or damages that may need replacement. If everything appears intact, clean the cartridge with a mix of equal parts vinegar and water to remove any mineral buildup that could be causing issues.
Step 4: Replace O-rings and Washers
If your shower valve is leaking, the issue may be with worn-out O-rings or washers. These small rubber pieces create a seal to prevent water from leaking out of the valve. To replace them, carefully remove the old ones using pliers and replace them with new ones.
The exact location and number of O-rings and washers may vary depending on your shower valve model, so consult your owner’s manual or Kohler customer service for assistance if needed.
Step 5: Install the New Cartridge
With the old cartridge removed, it’s time to install the new one. Begin by ensuring the valve housing is clean and free of debris or buildup. Wipe the interior with a clean cloth and inspect for any damage that might interfere with the proper installation of the cartridge.
Carefully insert the new cartridge into the valve housing, aligning it according to the manufacturer’s instructions. Make sure the cartridge is seated properly to avoid any leaks or operational issues. Once in place, secure it by tightening the retaining nut with an adjustable wrench. Be careful not to overtighten, as this could damage the cartridge or the valve assembly.
After the cartridge is installed, double-check that it is firmly in position and oriented correctly. This step is critical for ensuring that your shower functions correctly and efficiently.
Step 6: Reassemble the Trim and Handle
Now that the valve cartridge is installed reattach the trim and handle pieces in reverse order. Begin by sliding the trim plate back onto the shower valve and securing it with screws. Then, reattach the shower handle by aligning it correctly with the cartridge stem and tightening it with screws.
Finally, replace any decorative caps or covers on your shower handle to complete its appearance. Turn on the water supply to test your newly repaired Kohler shower valve for any leaks or functional issues.
Step 7: Flush and Clean Your Shower
Before using your repaired shower, run a few minutes of hot water through it to flush out any air or debris that may have accumulated during the repair process. This step ensures optimal performance and a clean water flow in your shower.
Additionally, take this opportunity to clean any remaining mineral buildup on your showerhead and other fixtures using the vinegar and water solution mentioned earlier.
Step 8: Contact Kohler Customer Service
If you encounter any difficulties or complications during the repair process, don’t hesitate to contact Kohler customer service for assistance. They can provide further troubleshooting steps or help with identifying replacement parts if needed.
Following these step-by-step instructions on how to repair a kohler shower valve should help you successfully repair your Kohler shower valve and restore its functionality. With proper maintenance and care, your shower valve should continue to work efficiently for years to come. Happy repairing!
Frequently Asked Questions
Q: How Do I Know if My Kohler Shower Valve Needs Repair?
A: Some common signs that your Kohler shower valve may need repair include inconsistent water temperature or pressure, leaking from the valve or handles, and difficulty turning the handle to adjust the water flow. If you notice any of these, it’s best to inspect and repair your shower valve promptly.
Q: Can I Repair a Kohler Shower Valve Myself?
A: Yes, as long as you have the necessary tools and follow proper safety precautions, you can repair a Kohler shower valve at home. However, if you feel uncomfortable or unsure about the process, it’s always best to contact a professional plumber for assistance.
Q: How Often Should I Maintain My Kohler Shower Valve?
A: It’s recommended that maintenance on your shower valve be performed at least once a year. This includes cleaning mineral buildup and checking for any leaks or damages that may require repair. Regular maintenance can help prolong the lifespan of your shower valve and prevent costly repairs in the future.
Q: What Should I Do if My Kohler Shower Valve is Still Not Working After Repair?
A: If your shower valve is still experiencing issues after following these repair steps, it’s best to contact Kohler customer service for further assistance. They may be able to provide additional troubleshooting tips or send a professional plumber to inspect and repair the valve.
Conclusion
Repairing a Kohler shower valve might seem daunting at first, but with the right tools, guidance, and a bit of patience, it can be a straightforward task. By following the step-by-step instructions provided in this guide on how to repair a kohler shower valve, you can address common issues such as leaks, inconsistent water flow, or temperature problems, ensuring your shower functions efficiently once more.
Regular maintenance and proper care are key to extending the lifespan of your shower valve and avoiding unnecessary repairs. Should you encounter difficulties at any stage, Kohler’s customer service team is always available to assist. With your shower restored, you can now enjoy a reliable and comfortable bathing experience.
About the Author
Adrian Green is a passionate woodworking enthusiast who has dedicated his life to the craft of woodworking. From his early days working alongside his father in the family woodworking shop, Adrian has honed his skills and developed a deep love for creating beautiful, functional pieces with his hands. As the voice behind The Woodenify Blog, he shares his knowledge, tips, and inspiration with fellow woodworkers of all skill levels, helping them build confidence in their abilities while learning new techniques.
Professional Focus
- Specializes in DIY woodworking projects, from furniture making to home décor.
- Provides step-by-step guides, tips, and practical tutorials for woodworkers at any skill level.
- Focused on empowering readers with confidence and knowledge through easy-to-follow instructions and hands-on techniques.
- Passionate about building a community where makers can share, learn, and grow together in the world of woodworking.
Education History
University of Craft and Design – Bachelor of Fine Arts (BFA) in Woodworking and Furniture Design
Woodworking Apprenticeships – Gained extensive hands-on experience through various workshops and mentorships with seasoned craftsmen, refining carpentry and furniture-making skills.
Expertise
- DIY woodworking, carpentry, furniture making, and home décor projects.
- Creating clear, accessible tutorials and guides for beginner to advanced woodworkers.
- Helping readers experience the satisfaction and fulfillment of turning raw materials into stunning finished products.