
Installing a water hydrant is an essential task for ensuring a reliable and convenient water supply for residential, agricultural, or recreational purposes. Whether you’re setting up a hydrant for garden irrigation, livestock watering, or general outdoor use, proper installation is key to its longevity and performance.
This guide on how to install water hydrant will walk you through the basic steps and best practices to install a water hydrant correctly and efficiently. By following these instructions, you can ensure your hydrant remains functional year-round, even in challenging weather conditions.
Why Install a Water Hydrant?
Before we dive into the installation process, let’s first understand why installing a water hydrant is necessary. A water hydrant is a plumbing fixture that provides access to running water in outdoor areas where traditional underground pipes are not available or practical. These areas may include gardens, pastures, fields, and other remote locations.
A properly installed water hydrant eliminates the need to constantly haul water from another source, which can be time-consuming and inconvenient. It also provides easier and safer access to water for activities like gardening, livestock watering, and even filling swimming pools.
8 Step-by-step Guides on How to Install Water Hydrant
Step 1: Gather the Necessary Tools and Materials
Before you start installing your water hydrant, make sure you have all the essential tools and materials for the job. These may include:
Shovel:
To dig the hole to bury the hydrant,
Trencher:
A trench must be created to connect the hydrant to your water source.
Pipe Cutter:
Cut the pipes according to your desired length.
Wrenches:
To tighten the fittings and connections securely.
Plumbing Tape:
To seal any potential leaks in the connections.
Hydrant Installation Kit:
This kit typically includes all necessary components for installing a water hydrant, such as valves, connectors, and mounting hardware.
Step 2: Choose an Appropriate Location
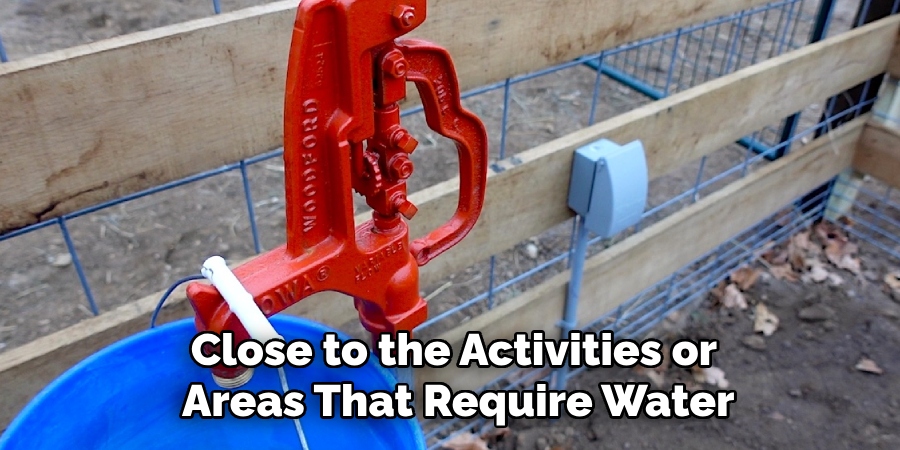
Selecting the right location for your water hydrant is crucial for functionality and convenience. Start by identifying an area that is easily accessible and close to the activities or areas that require water, such as gardens, livestock enclosures, or recreational spaces. Ensure the ground at the chosen site is stable and not prone to flooding, as excessive water accumulation can damage the hydrant or affect its performance.
Additionally, consider frost lines if you’re in a colder region, and place the hydrant at a depth that prevents freezing. The location should also allow for easy connection to your existing water supply line, minimizing the need for long or complex pipe installations.
Step 3: Dig the Hole
Once you have selected the appropriate location, it’s time to start digging the hole for the water hydrant. Using a shovel or post-hole digger, excavate a hole wide enough to accommodate both the hydrant and the surrounding materials. The depth of the hole should typically extend below the frost line in your region to prevent the hydrant from freezing during cold weather. Check with local building codes or guidelines to determine the proper depth for frost protection.

Make sure the bottom of the hole is level and firm to provide a stable base for the hydrant. If necessary, add a few inches of gravel at the base to aid drainage and ensure a solid foundation. The width of the hole should also allow for easy maneuvering during installation and proper backfilling once the hydrant is in place. Take care to dispose of the excavated soil nearby for use in backfilling later.
Step 4: Install the Connector Pipe
Now that you have excavated the hole, it’s time to install the connector pipe that will connect your water hydrant to the main supply line. Use a trencher or hand-dig a narrow channel from your mainline to the location of the hydrant. The depth of this trench should also extend below the frost line and allow for proper slope and drainage.
Connect one end of the pipe to your mainline, using appropriate fittings and connectors as needed. If necessary, use plumbing tape or sealant to ensure tight connections and prevent leaks. Ensure the pipe is level along its length by using a long-level tool.
Step 5: Insert the Hydrant
With the connector pipe in place, it’s time to insert the water hydrant into the hole. Carefully lower the hydrant into the hole, ensuring that it sits level on its base and aligns with your existing supply line. Use a level tool to confirm proper alignment before proceeding.
The hydrant should also be at the desired height, typically around one foot above the ground. Adjust the depth or height of the hydrant as needed by adding or removing soil from the hole. Once you’re satisfied with its positioning, use a wrench to secure the connector pipe to the base of the hydrant.
Step 6: Test for Leaks
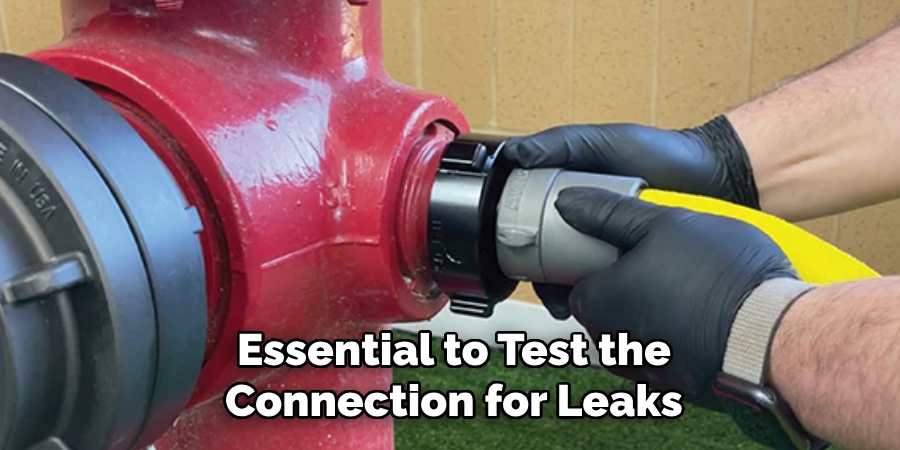
Before backfilling the hole, it’s essential to test the connection for leaks to avoid future problems. Turn on the water supply to the hydrant and allow water to flow through the system. Carefully inspect all connections, including the joint between the connector pipe and the hydrant, for any signs of dripping or water escaping.
If you notice any leaks, turn off the water supply and tighten the fittings using a wrench. If necessary, apply additional plumbing tape or sealant to the connections to ensure a proper seal. Repeat the process of turning on the water and checking for leaks until the system is fully watertight. Ensuring a leak-free setup at this stage will prevent water loss, potential damage, and costly repairs in the future.
Step 7: Backfill the Hole
Once you have confirmed a leak-free connection, it’s time to backfill the hole. Use the excavated soil and any additional material like gravel or sand to fill in gaps around the hydrant base. Carefully compact the soil with your foot or shovel as you backfill to ensure a stable, solid foundation for the hydrant.
Avoid using large rocks or debris when backfilling, as these may cause damage to the pipes or create unstable conditions. Continue filling in until all gaps are adequately filled and the surrounding ground is level with the top of the hydrant.
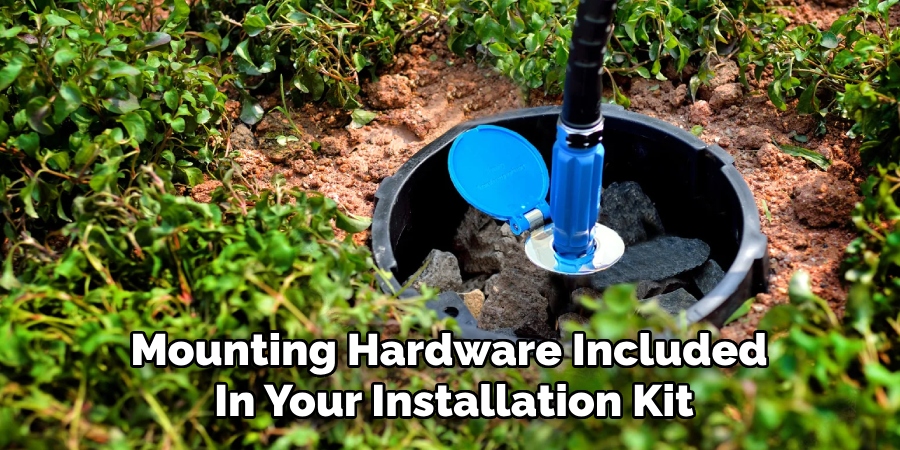
Step 8: Test and Secure
With everything installed and backfilled, turn on the water supply and test the hydrant for functionality. Confirm that it turns on and off smoothly, with no leaks or issues. If necessary, make any final adjustments to the depth or height of the hydrant before securing it
To secure the hydrant, use mounting hardware included in your installation kit, typically screws or bolts that attach to a concrete pad or other stable surface nearby. Once secured, give your new water hydrant one final test to ensure everything is functioning correctly.
Congratulations! Following these steps on how to install water hydrant will result in a professionally installed water hydrant that provides reliable access to water for all your outdoor needs. Remember to periodically check and maintain your hydrant to ensure its long-term performance and durability. Enjoy the convenience and functionality of having a water source nearby without the hassle or expense of complicated installations.
Additional Tips
To further enhance the longevity and functionality of your water hydrant, here are some additional tips:
- Install a shut-off valve near the main supply line to allow for easy maintenance and repairs without disrupting service to other areas.
- Use backflow prevention devices to prevent contamination from outside sources.
- Consider adding an additional hose connection, particularly if you plan on using the hydrant for multiple uses simultaneously.
- Regularly check and replace any worn or damaged parts, such as the handle or seals, to prevent leaks and maintain optimal performance.
- Properly winterize your water hydrant if you live in an area with freezing temperatures to prevent damage and ensure year-round functionality.
Following these tips will help maximize the lifespan of your water hydrant and ensure reliable access to water whenever you need it.
Frequently Asked Questions
Q1: How Deep Should the Hole for a Water Hydrant Be?
A1: The depth of the hole for your water hydrant will depend on the frost line in your area. Typically, it should extend below the frost line to prevent freezing and ensure year-round functionality.
Q2: Can I Install a Water Hydrant Myself?
A2: Yes, with the right tools and knowledge, installing a water hydrant can be a DIY project. However, if you are unfamiliar with plumbing or have any doubts about your abilities, it’s always best to consult a professional for proper installation.
Q3: What Type of Pipe Should I Use for the Connector Pipe?
A3: It is recommended to use polyethylene (PE) pipe for the connector pipe, as it is durable, flexible, and resistant to corrosion.
Q4: How Often Do I Need to Check and Maintain My Water Hydrant?
A4: It is recommended to check and maintain your water hydrant at least once a year, especially before winter. However, it’s always a good idea to regularly inspect for any signs of damage or leaks and address them promptly.
Conclusion
Installing a water hydrant can be a straightforward and rewarding project when approached with the right tools, knowledge, and preparation. By following the outlined steps on how to install water hydrant and incorporating the additional tips for maintenance and care, you can ensure a reliable and efficient water source for your outdoor needs.
Proper installation not only saves time and money but also adds convenience and functionality to your property. With regular upkeep and attention to potential issues, your water hydrant will provide years of dependable service. When designing your yard, exploring creative water hydrant ideas can add a rustic charm while providing a functional solution for your outdoor watering needs.
About the Author
Adrian Green is a passionate woodworking enthusiast who has dedicated his life to the craft of woodworking. From his early days working alongside his father in the family woodworking shop, Adrian has honed his skills and developed a deep love for creating beautiful, functional pieces with his hands. As the voice behind The Woodenify Blog, he shares his knowledge, tips, and inspiration with fellow woodworkers of all skill levels, helping them build confidence in their abilities while learning new techniques.
Professional Focus
- Specializes in DIY woodworking projects, from furniture making to home décor.
- Provides step-by-step guides, tips, and practical tutorials for woodworkers at any skill level.
- Focused on empowering readers with confidence and knowledge through easy-to-follow instructions and hands-on techniques.
- Passionate about building a community where makers can share, learn, and grow together in the world of woodworking.
Education History
University of Craft and Design – Bachelor of Fine Arts (BFA) in Woodworking and Furniture Design
Woodworking Apprenticeships – Gained extensive hands-on experience through various workshops and mentorships with seasoned craftsmen, refining carpentry and furniture-making skills.
Expertise
- DIY woodworking, carpentry, furniture making, and home décor projects.
- Creating clear, accessible tutorials and guides for beginner to advanced woodworkers.
- Helping readers experience the satisfaction and fulfillment of turning raw materials into stunning finished products.