
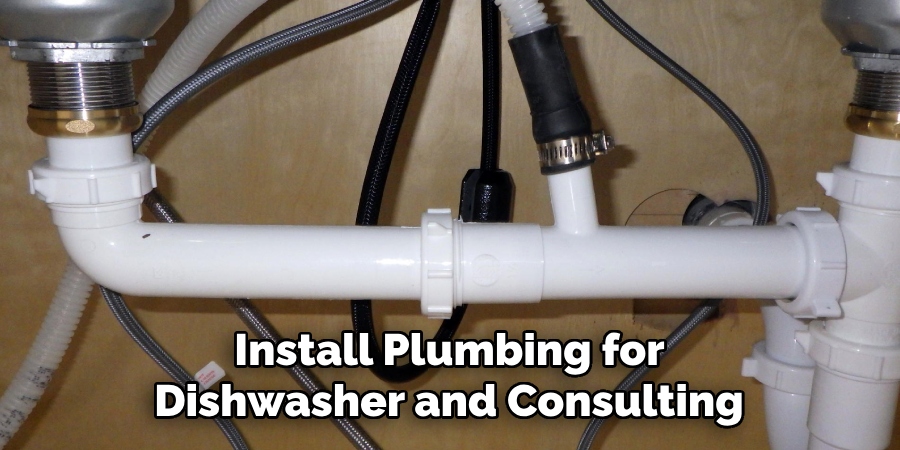
Installing plumbing for a dishwasher may seem like a daunting task, but with the right tools and guidance, it can be completed efficiently. Whether you’re replacing an old unit or installing a dishwasher for the first time, proper plumbing ensures the appliance functions effectively without leaks or drainage issues.
This guide on how to install plumbing for dishwasher will walk you through the basic steps and key considerations to set up the plumbing for your dishwasher, even if you are a beginner. A dishwasher cleaner DIY solution, made with natural ingredients like vinegar and baking soda, can help remove buildup and odors, keeping your dishwasher running efficiently.
Why is Proper Plumbing Important for a Dishwasher?
Before we dive into the installation process, it’s essential to understand why proper plumbing is crucial for your dishwasher. A properly installed plumbing system ensures that the appliance can function effectively without any leakages or clogs in the drainage pipes.
Moreover, incorrect plumbing can cause damage to your dishwasher or even lead to water damage in your kitchen. So, investing time and effort into installing the plumbing correctly will save you from potential headaches down the line.
Tools and Materials You Will Need
To install the plumbing for a dishwasher, you will need some basic tools and materials, including:
Adjustable Wrench:
An adjustable wrench is a must-have tool for any plumbing project as it allows you to tighten and loosen nuts and bolts of different sizes.
Pliers:
Pliers will come in handy when connecting the water supply line to the dishwasher’s inlet valve.
Teflon Tape:
Teflon tape, also known as plumber’s tape, is used to create a watertight seal on threaded connections. It is essential for preventing leaks in your plumbing system.
Drainage Hose:
The drainage hose connects the dishwasher’s drain outlet to either the disposal unit or directly into the sink drain. Make sure to measure and cut it to the appropriate length before installation.
Water Supply Line:
The water supply line connects the dishwasher’s inlet valve to the hot water supply under your sink. It is usually included with the dishwasher, but if not, you can purchase one at any hardware store.
Screwdriver:
A screwdriver will be needed for tightening and loosening screws during installation.
8 Step-by-step Guides on How to Install Plumbing for Dishwasher
Step 1: Positioning Your Dishwasher

Before beginning the plumbing installation, you need to position your dishwasher correctly. Place the dishwasher near its intended location, usually next to the kitchen sink, as this makes it easier to connect to the water supply and drainage system. Ensure that the dishwasher is not plugged in yet, and slide it into its space carefully, leaving enough room to access the back for connecting the plumbing.
Check that the area is level using a spirit level, as an uneven dishwasher can lead to improper drainage or operational issues. Adjust the leveling feet on the bottom of the dishwasher as necessary to ensure a stable and level position. Once it’s in place, confirm there’s enough clearance for the door to open fully without obstruction.
Step 2: Connecting the Water Supply Line
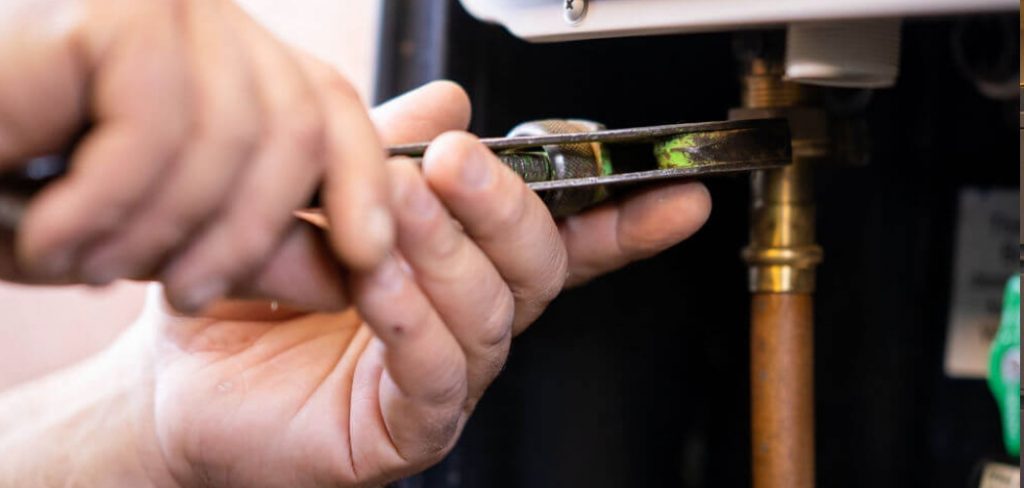
The next step is to connect the water supply line to the dishwasher. Begin by locating the dishwasher inlet valve, typically found at the bottom of the unit. Wrap Teflon tape around the threaded end of the inlet valve to ensure a watertight seal. Attach one end of the water supply line to the inlet valve by threading it securely. Use an adjustable wrench to tighten the connection, but avoid overtightening as this could damage the threads.
Next, connect the other end of the water supply line to the hot water supply under the sink. If there’s no available connection, you may need to install a dual inlet adapter to accommodate both the dishwasher and faucet connections. Like before, apply Teflon tape to the threads of the supply valve to prevent leaks. Secure the water supply line to the adapter or valve using pliers or a wrench.
Step 3: Installing the Drainage Hose
The drainage hose is responsible for removing wastewater from the dishwasher. Most dishwashers come with a pre-installed hose, but if not, you can purchase one at any hardware store. Measure and cut the drainage hose to fit your specific installation before beginning. Once you have the right length, attach one end of the hose to the drain outlet on the back of your dishwasher. Secure it in place using a clamp or zip tie.
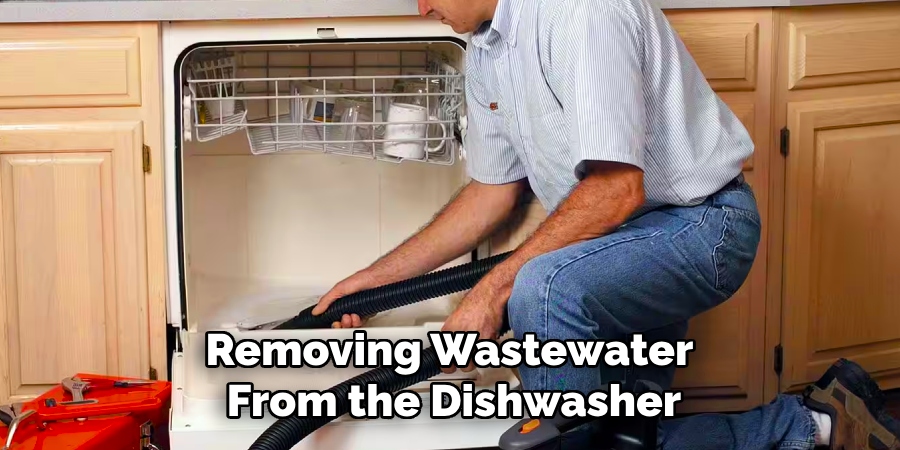
If your dishwasher has a disposal unit, you will need to connect the other end of the hose to its inlet port. Otherwise, thread it into your sink’s drain line and secure it in place using a clamp or zip tie. Make sure the hose is securely connected and not kinked, as this could cause drainage issues.
Step 4: Connecting the Power Supply
Before connecting the power supply, make sure your dishwasher is unplugged to avoid any electrical accidents. Locate the power source under your kitchen sink and use a screwdriver to remove the cover plate.
Then, feed the dishwasher’s power cord through the hole in the cover plate and connect it to an outlet or electrical junction box. If you are unsure about working with electricity, it is always best to consult a professional electrician for assistance.
Step 5: Securing Drainage Hose
Once all connections have been made, it’s essential to secure the drainage hose to avoid any potential leaks or blockages. Use clamps or zip ties to secure the hose at both ends and along its length, keeping it firmly attached to your dishwasher and drain line.
The drainage hose should have a slight downward slope to allow for proper drainage of wastewater. Check the installation manual for your specific dishwasher model to determine the recommended angle.
Step 6: Checking for Leaks
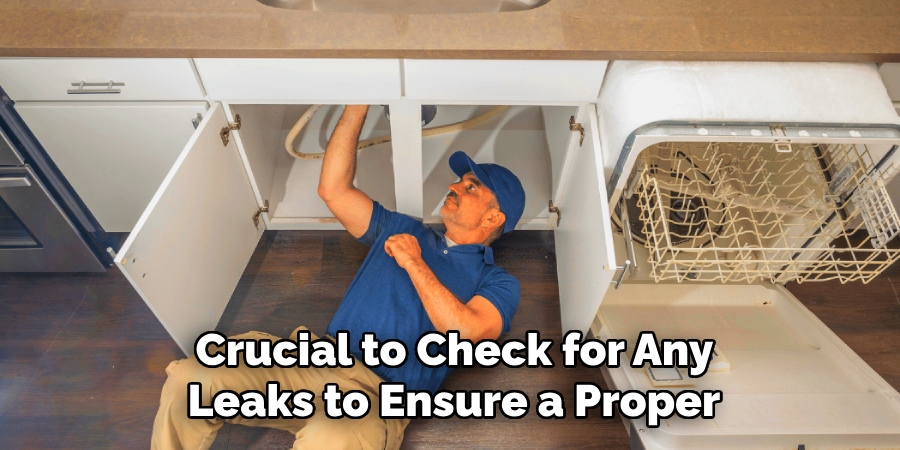
Once all the connections are in place, it’s crucial to check for any leaks to ensure a proper and secure installation. Begin by turning on the water supply under the sink and allowing water to flow to the dishwasher. Carefully inspect all connection points, including the water supply line, drainage hose, and adjacent plumbing, for any signs of dripping or pooling water.
If you notice any leaks, turn off the water supply immediately and tighten the affected connections. You may need to reapply Teflon tape on threaded connections to create a tighter seal. Once you’ve resolved any issues, turn the water supply back on and perform another inspection. Repeat this process until all connections are leak-free.
Step 7: Testing the Dishwasher
With all plumbing connections secure and leak-free, it’s time to test your dishwasher’s functionality. Close the door, plug in the dishwasher, and turn on the power supply. Next, fill the dishwasher with a small amount of water and start a wash cycle.
Listen for any unusual noises or vibrations as this could indicate a potential issue with installation. Also, keep an eye on the drainage system for proper flow and make sure there are no leaks during operation.
Step 8: Finishing Touches
If everything is functioning correctly, you can put the finishing touches on your installation by attaching any trim pieces or cover plates provided by the manufacturer. Also, check that your dishwasher is level once again and make any necessary adjustments.
Finally, run a full cycle with dirty dishes to ensure everything is working correctly and enjoy your newly installed dishwasher!
Following these steps on how to install plumbing for dishwasher and consulting your dishwasher’s installation manual should result in a successful and functional installation. Remember to always take necessary safety precautions and consult a professional if you are unsure about any steps in the process. A properly installed dishwasher can make life easier, so don’t be afraid to tackle this DIY project!
Additional Tips for a Successful Plumbing Installation
- Before beginning installation, always read the instruction manual carefully to familiarize yourself with the specific requirements of your dishwasher model.
- Use caution when handling plumbing components and tools. Wear protective gear if necessary.
- If you’re unsure about any step in the installation process, don’t hesitate to consult a professional plumber for assistance.
- Regularly clean and maintain your dishwasher to ensure it continues functioning properly. This includes cleaning the filter, removing any food debris, and checking for blockages in the drainage hose.
- If you encounter any issues during or after installation, refer to your dishwasher’s manual for troubleshooting tips or contact customer support for assistance. Overall, with proper preparation and careful execution, installing plumbing for a dishwasher can be a manageable DIY project that will make your kitchen routine more efficient. Enjoy your new dishwasher!
Frequently Asked Questions
Q: Can I Install a Dishwasher Without a Disposal Unit?
A: Yes, you can. Simply attach the drainage hose to your sink’s drain line instead of the disposal unit’s inlet port. The installation steps will be similar, but you may need to adjust the hose length accordingly.
Q: Can I Install a New Dishwasher in Place of an Old One?
A: Yes, you can. The steps for installation will be similar to a new installation, but you may need to remove the old dishwasher first and make adjustments to the plumbing connections if necessary.
Q: How Long Will It Take to Install Plumbing for a Dishwasher?
A: The time it takes will vary depending on your experience level and the specific requirements of your dishwasher model. On average, it may take between 2-4 hours. Allow yourself enough time and don’t rush through the process to ensure proper installation.
Conclusion
Installing the plumbing for a dishwasher may seem like a daunting task at first, but with careful preparation and attention to detail, it can be a very manageable and rewarding DIY project. By following step-by-step instructions on how to install plumbing for dishwasher, ensuring all connections are secure, and taking the time to check for leaks and proper functionality, you can confidently install your dishwasher and enjoy its convenience for years to come.
Always prioritize safety and consult professionals when needed. A well-installed dishwasher not only saves time but also enhances the efficiency of your kitchen, making it a valuable addition to your home. Happy installing!
About the Author
Adrian Green is a passionate woodworking enthusiast who has dedicated his life to the craft of woodworking. From his early days working alongside his father in the family woodworking shop, Adrian has honed his skills and developed a deep love for creating beautiful, functional pieces with his hands. As the voice behind The Woodenify Blog, he shares his knowledge, tips, and inspiration with fellow woodworkers of all skill levels, helping them build confidence in their abilities while learning new techniques.
Professional Focus
- Specializes in DIY woodworking projects, from furniture making to home décor.
- Provides step-by-step guides, tips, and practical tutorials for woodworkers at any skill level.
- Focused on empowering readers with confidence and knowledge through easy-to-follow instructions and hands-on techniques.
- Passionate about building a community where makers can share, learn, and grow together in the world of woodworking.
Education History
University of Craft and Design – Bachelor of Fine Arts (BFA) in Woodworking and Furniture Design
Woodworking Apprenticeships – Gained extensive hands-on experience through various workshops and mentorships with seasoned craftsmen, refining carpentry and furniture-making skills.
Expertise
- DIY woodworking, carpentry, furniture making, and home décor projects.
- Creating clear, accessible tutorials and guides for beginner to advanced woodworkers.
- Helping readers experience the satisfaction and fulfillment of turning raw materials into stunning finished products.