
Installing a shower niche is a practical and stylish way to add storage and functionality to your bathroom.
A shower niche provides a convenient space to store toiletries like shampoo, conditioner, and soap while keeping them easily accessible. With proper planning and the right tools, installing a shower niche can be a straightforward DIY project that enhances both the aesthetic and usability of your shower space.
This guide on how to install a shower niche will walk you through the essential steps to ensure a successful installation. When installing a shower niche, choosing the right shower niche trim can add a polished, professional look while protecting the edges from moisture damage.
Why Install a Shower Niche?
Before diving into the installation process, it’s essential to understand why installing a shower niche can be beneficial.
First and foremost, shower niches offer practical storage solutions for your shower essentials. Instead of cluttering your shower floor with bottles and containers, a niche keeps everything in one organized place.
Moreover, adding a shower niche can enhance the overall look of your bathroom by creating a modern and seamless design. You can choose from various materials, such as tile, stone, or even metal, to match your bathroom’s style and add a personal touch.
Lastly, having a shower niche reduces the risk of accidents in the shower by eliminating potential tripping hazards caused by scattered toiletries on the floor.
Needed Materials
Before starting the installation process, it’s essential to have all the necessary materials on hand. This includes:
- Shower niche (pre-fabricated or a custom-made one)
- Level
- Tape measure
- Pencil
- Drill or screwdriver
- Waterproofing membrane (such as RedGard or Kerdi) and a paintbrush for application
- Notched trowel for spreading adhesive
- Tile adhesive and grout (if using tile for the niche)
8 Step-by-step Guides on How to Install a Shower Niche
Step 1: Choose the Location
The first step is to determine where you want your shower niche to be placed. It’s recommended to install it at eye level and within reach, so consider your height and arm length when choosing the location.

Also, make sure there are no pipes or electrical wires running through the chosen area.
Step 2: Trace the Niche’s Outline
Once you’ve determined the ideal location for your shower niche, the next step is to trace its outline onto the wall. Start by holding the niche or its template against the chosen spot. Use a level to ensure that the niche will be perfectly horizontal and vertically aligned.
Then, with a pencil, trace around the edges to create a clear outline on the wall. Double-check the measurements to ensure accuracy, as this will guide the cutting process and help avoid mistakes that could affect the niche’s fit.
Step 3: Cut the Wall for Niche Insertion

Using a drill or screwdriver, create holes at each of the four corners of the traced outline. Then, use a jigsaw to connect the holes and cut out the designated area. Be careful not to damage any pipes or wires in this process.
Now, you should have a hole in your wall that perfectly fits your chosen niche’s dimensions.
Step 4: Prepare the Shower Niche
If you’re using a pre-fabricated shower niche, it should come with installation instructions. Follow these carefully before proceeding with step five.
For custom-made niches, make sure they are fully waterproofed on all sides, including the back and bottom. This is to prevent water from damaging the wall behind it.
Step 5: Apply Waterproofing Membrane

Before inserting the niche into the hole in your wall, apply a waterproofing membrane to all sides of the cut-out area. This will create a barrier between the shower water and your walls, preventing any potential water damage.
Follow the instructions on your chosen waterproofing membrane for proper application and drying time before proceeding with step six.
Step 6: Insert Niche into Wall
Once the waterproofing membrane has dried completely, carefully insert your shower niche into the cut-out hole. Use a level to ensure it is perfectly horizontal and vertically aligned.
Depending on the niche’s design, it may have flanges or screws for securing it to the wall. Follow the manufacturer’s instructions for proper installation.
Step 7: Apply Adhesive and Grout (if using tile)
If you’re using tiles to cover your shower niche, now is the time to apply adhesive and grout. Use a notched trowel to spread adhesive on the back of each tile before placing them onto the niche’s sides. Allow time for drying before grouting.
Follow the manufacturer’s instructions for proper application and drying times.
Step 8: Finish with Caulking
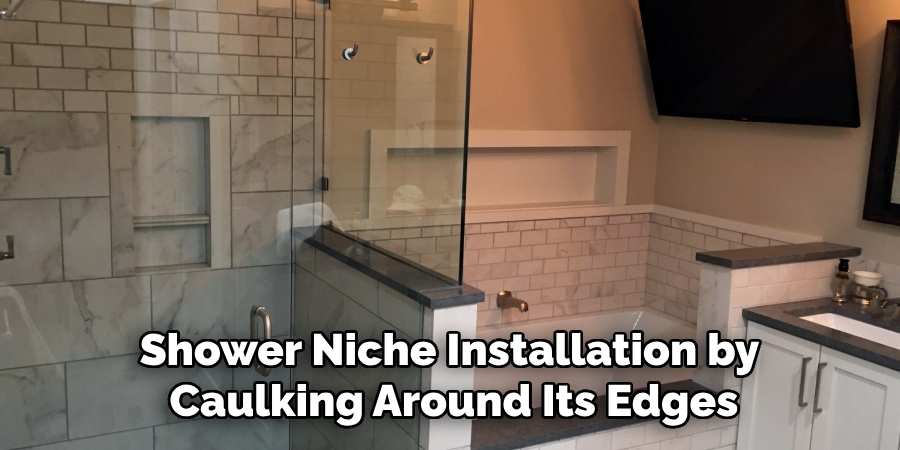
Once everything has dried, finish off your shower niche installation by caulking around its edges. This will create a watertight seal and prevent any water from seeping behind the niche.
Choose a caulk color that matches your tiles for a seamless finish.
Following these eight steps on how to install a shower niche, your shower niche should now be installed and ready to use. Enjoy the added convenience and aesthetic appeal it brings to your bathroom!
Maintenance
To ensure your shower niche stays in good condition, it’s essential to regularly clean and maintain it. Avoid using harsh cleaning products or abrasive materials that could damage the niche’s surface.
If you notice any water damage or mold growth, address these issues immediately to prevent further damage. Also, periodically check the waterproofing membrane and caulking for any cracks or damages and repair them as needed.
With proper maintenance, your shower niche can last for years to come, providing both functionality and style to your bathroom.
Do You Need to Use Professionals?
While installing a shower niche can be a rewarding DIY project, there are situations where hiring a professional might be the better option. If you’re unfamiliar with tools like drills, jigsaws, or waterproofing membranes, or if your shower walls contain complex plumbing, electrical wiring, or load-bearing structures, a professional’s expertise can ensure the installation is done safely and correctly.
Professionals also bring experience and knowledge that can save you time and prevent costly mistakes, especially when dealing with custom-made niches or intricate tile designs. While opting for professional help may increase upfront costs, it can provide peace of mind and a higher-quality result. Ultimately, the decision to use a professional depends on your skill level, confidence, and the complexity of the project.
How Much Could It Cost?
The cost of installing a shower niche can vary widely depending on several factors such as the type of niche, materials used, and whether you choose to do it yourself or hire a professional. On average, a prefabricated shower niche can cost anywhere from $30 to $150 or more depending on the size, material, and features. If you opt for a custom-built niche, costs can rise significantly, with prices ranging from $200 to $500 or even higher, especially if intricate tile work is involved.
For a DIY installation, your total expenses will include the niche itself, additional materials like waterproofing membrane, adhesive, grout, and tiles, as well as the tools you may need to purchase or rent. These costs could range from $50 to $200, depending on what you already have on hand.
If you decide to hire a professional, labor costs can add $300 to $800 or more to your total cost, depending on your location and the complexity of the job. While hiring a professional increases the overall expense, it ensures a high-quality installation and peace of mind. It’s important to get multiple quotes and fully understand what is included in the estimate to avoid unexpected expenses.
Ultimately, the cost of installing a shower niche depends on your preferences, budget, and level of expertise. A careful evaluation of these factors will help you determine the best option for your project.
Frequently Asked Questions
Q: Can I Install a Shower Niche in an Already Tiled Wall?
A: Yes, it is possible to install a shower niche in an existing tiled wall. However, it may require more time and effort to cut through the tiles and ensure a proper fit for the niche.
Q: How Do I Choose the Right Size Shower Niche?
A: The size of your shower niche will depend on personal preference and the available space in your bathroom. Consider your storage needs and the dimensions of your toiletries when choosing the size.
Q: Can I Install Multiple Shower Niches in One Shower?
A: Yes, you can install multiple shower niches in one shower if there is enough space and it fits with your overall design aesthetic. Just make sure to plan their placement carefully to avoid overcrowding or uneven spacing.
Conclusion
Installing a shower niche is a practical and stylish way to enhance the functionality of your bathroom. By following the step-by-step guide on how to install a shower niche provided, you can ensure a smooth installation process that results in a durable and attractive feature.
A well-installed and maintained shower niche not only provides convenient storage for your toiletries but also adds a touch of elegance to your shower space. With proper care and attention, your shower niche will remain a valuable addition to your bathroom for years to come.
About the Author
Adrian Green is a passionate woodworking enthusiast who has dedicated his life to the craft of woodworking. From his early days working alongside his father in the family woodworking shop, Adrian has honed his skills and developed a deep love for creating beautiful, functional pieces with his hands. As the voice behind The Woodenify Blog, he shares his knowledge, tips, and inspiration with fellow woodworkers of all skill levels, helping them build confidence in their abilities while learning new techniques.
Professional Focus
- Specializes in DIY woodworking projects, from furniture making to home décor.
- Provides step-by-step guides, tips, and practical tutorials for woodworkers at any skill level.
- Focused on empowering readers with confidence and knowledge through easy-to-follow instructions and hands-on techniques.
- Passionate about building a community where makers can share, learn, and grow together in the world of woodworking.
Education History
University of Craft and Design – Bachelor of Fine Arts (BFA) in Woodworking and Furniture Design
Woodworking Apprenticeships – Gained extensive hands-on experience through various workshops and mentorships with seasoned craftsmen, refining carpentry and furniture-making skills.
Expertise
- DIY woodworking, carpentry, furniture making, and home décor projects.
- Creating clear, accessible tutorials and guides for beginner to advanced woodworkers.
- Helping readers experience the satisfaction and fulfillment of turning raw materials into stunning finished products.