
Installing a pedestal sink is an excellent way to add elegance and functionality to your bathroom. With its sleek and compact design, a pedestal sink saves space while providing a stylish upgrade to the overall aesthetic.

While the process may seem daunting at first, with the right tools and guidance, installing a pedestal sink can be a manageable DIY project. This guide will walk you through each step of how to install a pedestal sink.
Benefits of Installing a Pedestal Sink
A pedestal sink offers several benefits that make it an attractive choice for many homeowners. First and foremost, its compact design is ideal for small bathrooms or powder rooms, as it takes up minimal space while still providing a functional sink. The open design also creates an illusion of more space, making cramped areas appear larger and less cluttered.
Additionally, pedestal sinks are timeless and versatile, blending seamlessly with various bathroom styles, from traditional to modern. Their durable construction often includes materials like porcelain or vitreous china, ensuring they are both sturdy and long-lasting. Finally, pedestal sinks are relatively easy to clean and maintain, as their streamlined design reduces hard-to-reach areas where dirt and grime can accumulate. These benefits make them a practical and stylish choice for any bathroom.
Tools and Materials You’ll Need
Before installing a pedestal sink, gather the necessary tools and materials to ensure a smooth and efficient process. Here’s a list of items you’ll typically need:
- Wrench set – For tightening and securing bolts and plumbing connections.
- Screwdriver – To attach brackets or other hardware.
- Measuring tape – To accurately measure spacing and placement.
- Drill and drill bits – For creating holes in the wall for mounting brackets.
- Level – To ensure the sink and pedestal are installed evenly.
- Plumber’s putty or silicone sealant – To create a watertight seal around the sink and fixtures.
- Pipe cutter – For resizing pipes to fit the required dimensions.
- PVC primer and cement – To connect plastic pipes securely.
- Bucket and towels – To catch and clean up any water spills.
- Safety gear – Such as gloves and safety glasses to protect yourself during the installation process.
Having these tools and materials ready beforehand will help streamline the installation and minimize any potential delays.
10 Methods How to Install a Pedestal Sink
1. Turn Off the Water Supply and Prepare the Area
Before beginning any installation, it is essential to shut off the water supply to prevent leaks or accidental flooding. Locate the bathroom’s shutoff valves—usually found under the sink—and turn them clockwise to close. If there are no localized valves, turn off the main water line to your home. Open the faucet to release any remaining pressure in the pipes.

Next, clear out the existing vanity, if applicable, by disconnecting the water lines and removing the basin and cabinet. Clean the wall thoroughly and patch any damage. If necessary, paint or retile the area behind where the pedestal sink will be installed, since these details will remain visible due to the open design.
2. Measure and Mark for Placement
A pedestal sink comes in two main components: the basin and the pedestal base. Position the pedestal against the wall and rest the basin on top to get a sense of how the assembled unit will sit in the space. Use a pencil to mark the outline of the basin on the wall and the location of the pedestal on the floor.
Also mark the locations of the mounting holes on the basin and the bolt locations on the floor. This step ensures your plumbing lines will align and your sink will sit level and securely. Take precise measurements, especially if you are working with a compact bathroom, to avoid misalignments or awkward spacing.
3. Secure Wall Backing for Support
Pedestal sinks must be anchored firmly to the wall because the basin rests partially on the pedestal but relies heavily on wall fasteners for true support. If your wall lacks adequate support—such as wood blocking behind drywall—you’ll need to install a wood backing between the wall studs.
This is especially critical if you’re mounting the sink on drywall alone. Remove a portion of the drywall, insert a 2×6 or 2×8 board horizontally between studs at the height where the basin will be fastened, and then patch the drywall back. This extra step ensures the heavy porcelain basin won’t stress the wall over time.
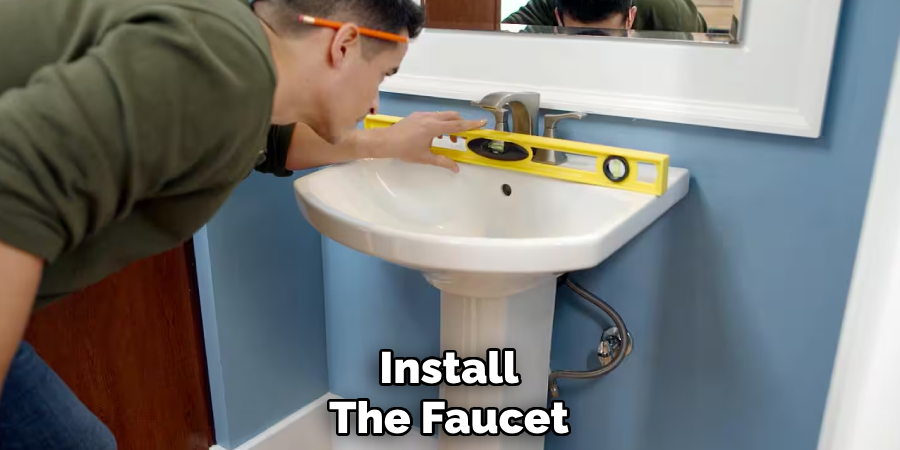
4. Install the Faucet and Drain Assembly First
Before mounting the sink basin, it is much easier to install the faucet and drain assembly while the unit is still movable. Turn the basin upside down on a soft towel or blanket to avoid chipping the porcelain. Install the faucet according to the manufacturer’s instructions, inserting the spout and handles through the pre-drilled holes and securing them with mounting nuts.
Then assemble the drain flange, rubber gasket, and tailpiece underneath. Apply a bead of plumber’s putty under the drain flange to seal it. Tighten all parts snugly but avoid overtightening, which could crack the ceramic or create leaks.
5. Attach the Sink Basin to the Wall
With the faucet and drain in place, carefully lift the sink basin and position it against the wall at your previously marked height. Align it with the wall’s mounting holes.
Use a level to ensure the basin is even, and then mark the final placement for wall anchors or bolts. Remove the sink momentarily, drill pilot holes, and insert wall anchors suitable for your wall type (toggle bolts for drywall, masonry anchors for tile or brick). Reposition the sink and secure it with lag bolts or screws, using rubber washers to protect the ceramic. Ensure everything is tightened firmly, but not excessively.
6. Set the Pedestal in Position
Once the basin is securely fastened, position the pedestal underneath it so that it bears part of the basin’s weight. Make sure the base lines up with your previous floor marks and that it stands squarely upright. If your floor is uneven, you may need to add shims beneath the pedestal base for balance.
Mark the bolt holes on the floor, remove the pedestal, drill pilot holes, and insert anchors if required. Then, place the pedestal back and secure it to the floor using bolts or screws. At this point, double-check that the basin and pedestal are level and the drain aligns properly.
7. Connect the Water Supply Lines
Now that the sink is physically installed, reconnect the water lines. Attach flexible supply hoses from the hot and cold faucet connections to the corresponding shutoff valves on the wall. Use an adjustable wrench to tighten compression fittings, ensuring a snug seal. It is recommended to wrap Teflon tape (plumber’s tape) around the threaded ends to prevent leaks. Be careful not to overtighten, as it could damage the fittings. Once connected, leave the valves off for now while you complete the drain system below.
8. Install the P-Trap and Drain Connections

The drain assembly includes a curved P-trap that connects the sink’s tailpiece to the wall drain. Measure and cut the tailpiece if needed so the trap sits comfortably without being forced. Attach the P-trap to the sink tailpiece and then to the wall stub-out, using slip joint nuts and washers.
All fittings should be hand-tightened first and then snugged slightly with pliers to prevent leaks. Ensure the trap is sloped slightly toward the wall drain for proper water flow and odor prevention. Once secured, run water briefly to check for leaks before sealing everything in place.
9. Seal and Finish the Edges
To provide a finished look and prevent water from seeping behind the sink, apply a bead of silicone caulk along the back edge where the basin meets the wall and around the base of the pedestal where it contacts the floor. Use a damp finger or caulk-smoothing tool to smooth the bead for a clean appearance. Allow the caulk to cure according to the manufacturer’s instructions before using the sink. Choose a caulk color that matches your sink or wall for seamless blending.
10. Turn On Water and Final Inspection
Finally, turn on the water supply valves and open the faucet handles to allow water to flow. Check all connections—both water supply lines and drain assembly—for leaks. Tighten any fittings as needed and wipe away drips. Let the water run for several minutes to ensure consistent pressure and that the P-trap functions correctly.
If everything works properly, clean up your work area, remove any pencil marks on the wall, and admire your elegant new pedestal sink. Enjoy the additional floor space and classic charm it brings to your bathroom.

Conclusion
Pedestal sink storage ideas is a rewarding project that combines functionality with style. By following these steps carefully and ensuring each connection is secure, you can transform your bathroom with a timeless and space-saving upgrade. Remember to take your time, double-check your work, and consult a professional if you encounter any unexpected challenges.
With attention to detail and a bit of patience, you can achieve a polished result that enhances both the appearance and practicality of your space. Thanks for reading, and we hope this has given you some inspiration on how to install a pedestal sink!
About the Author
Adrian Green is a passionate woodworking enthusiast who has dedicated his life to the craft of woodworking. From his early days working alongside his father in the family woodworking shop, Adrian has honed his skills and developed a deep love for creating beautiful, functional pieces with his hands. As the voice behind The Woodenify Blog, he shares his knowledge, tips, and inspiration with fellow woodworkers of all skill levels, helping them build confidence in their abilities while learning new techniques.
Professional Focus
- Specializes in DIY woodworking projects, from furniture making to home décor.
- Provides step-by-step guides, tips, and practical tutorials for woodworkers at any skill level.
- Focused on empowering readers with confidence and knowledge through easy-to-follow instructions and hands-on techniques.
- Passionate about building a community where makers can share, learn, and grow together in the world of woodworking.
Education History
University of Craft and Design – Bachelor of Fine Arts (BFA) in Woodworking and Furniture Design
Woodworking Apprenticeships – Gained extensive hands-on experience through various workshops and mentorships with seasoned craftsmen, refining carpentry and furniture-making skills.
Expertise
- DIY woodworking, carpentry, furniture making, and home décor projects.
- Creating clear, accessible tutorials and guides for beginner to advanced woodworkers.
- Helping readers experience the satisfaction and fulfillment of turning raw materials into stunning finished products.