
Are you having issues with your Navien Combi Boiler? One of the first steps to troubleshooting any boiler problems is to flush it.
Flushing a Navien Combi Boiler is an essential maintenance task that helps ensure the system operates efficiently and effectively over time. Over months or years of use, minerals and debris can build up within the system, potentially reducing performance and causing long-term damage. By performing a proper flush, you can clear out sediment, enhance water flow, and extend the lifespan of your boiler.
This guide on how to Flush a Navien Combi Boiler will outline the steps needed to safely and thoroughly flush your Navien Combi Boiler, ensuring it continues to provide reliable heating and hot water. Let’s get started!
What Are the Benefits of Flushing a Navien Combi Boiler?
There are several benefits to flushing your Navien Combi Boiler regularly. These include:
- Improved energy efficiency, resulting in lower utility bills
- Reduced risk of system breakdowns and costly repairs
- Extended lifespan of the boiler
- Better water flow and circulation, leading to faster heating and improved hot water supply
Once you understand the benefits of flushing your Navien Combi Boiler, you must know when and how often this maintenance task should be performed.
What Will You Need?
Before embarking on the flushing process, gathering all the necessary tools and equipment is crucial. These include:
- Screwdriver
- Hose pipes
- A bucket or large container for collecting flushed water
- Descaling solution or vinegar

You can begin the flushing process once you have all the necessary items.
9 Easy Steps on How to Flush a Navien Combi Boiler
Step 1. Turn Off the Boiler and Power Supply
Before starting the flush, ensure the boiler is completely turned off and disconnected from the power supply. This step is crucial to avoid any risk of electrical shock or damage to the unit during maintenance. Locate the power switch or circuit breaker associated with the boiler and ensure it is in the “off” position. Additionally, allow the boiler to cool down if it has recently been in use, as the water and components inside may still be hot. Taking these precautions will ensure a safe environment in which to proceed with the next steps of the flushing process.
Step 2. Shut Off the Water Supply
Locate the valve that controls the water flow to the boiler system. This is typically found near the boiler itself or along the water supply line. Turn the valve to the “off” position to stop water flow into the system. Shutting off the water supply is essential to prevent new water from entering the boiler during flushing. This step also ensures that pressure within the system does not build up while you are working, reducing the risk of leaks or accidental water discharge. Once the water supply is securely turned off, you can proceed with the remaining steps confidently, knowing the system is isolated from any active water flow.
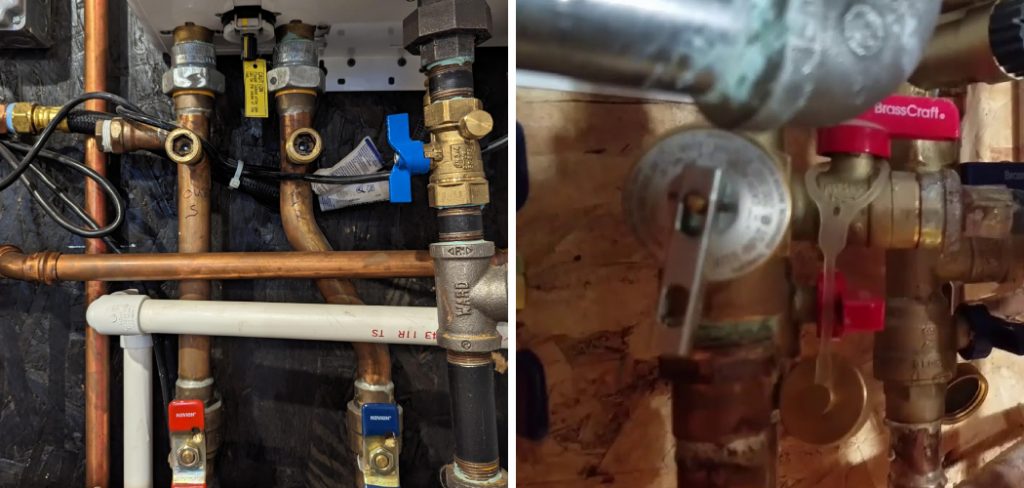
Step 3. Drain the Boiler
Begin by locating the drain valve on your boiler system. This valve is usually situated at the bottom of the boiler and is designed to allow emptying water from the unit. Before opening the valve, position a large bucket or connect a garden hose to the valve to channel the water safely to a drain or an outdoor area. Ensure the hose is secure and directed to a location where hot water can be discharged without causing damage or injury.
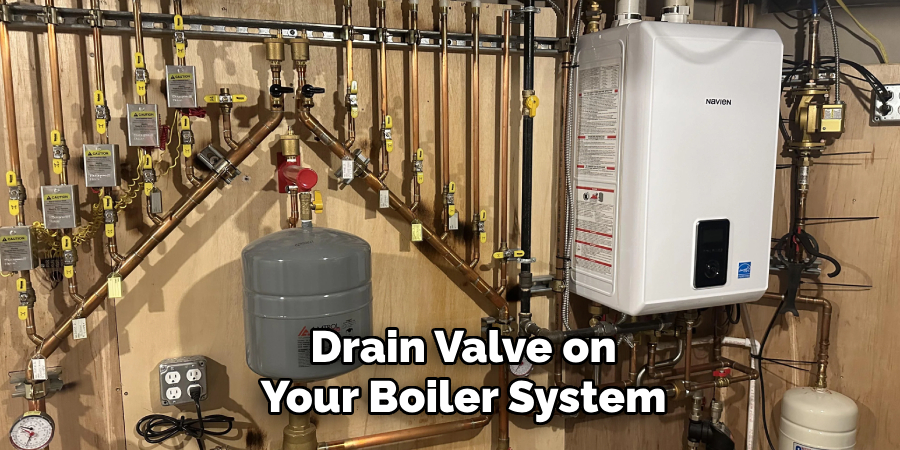
Once everything is in place, carefully open the drain valve. Allow the water to flow out completely, keeping an eye on the process to ensure it drains smoothly. Depending on the size of the boiler and the amount of water inside, this step may take some time. It’s essential to monitor the discharge as it may still contain sediment or mineral buildup that has accumulated within the boiler system over time.
Step 4. Flush the Boiler System
After draining the boiler, the next step is to flush it thoroughly to remove any remaining sediment or debris. To do this, use a hose to direct a steady flow of fresh water into the boiler through the drain valve or a designated flushing port, if available. This process helps clear out mineral buildup and other contaminants that may have settled in the system over time.
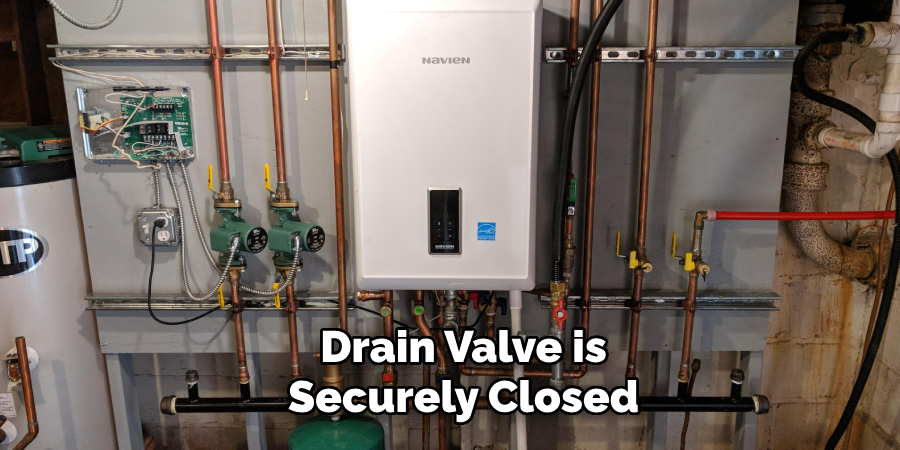
Keep the drain valve open during the flushing process to allow water and loosened debris to exit the boiler. Monitor the water exiting the boiler; continue flushing until the water runs clear, indicating the system is clean. Once the flushing is complete, turn off the water supply and close the drain valve securely. This step ensures your boiler operates efficiently and prolongs its lifespan.
Step 5. Refill the Boiler and Bleed Air from the System
Refill the system with fresh water once the boiler has been thoroughly flushed and the drain valve is securely closed. Attach the water supply to the designated inlet and slowly allow water to flow into the boiler. Monitor the water level to ensure it does not exceed the recommended level indicated by the manufacturer.
After refilling, it is essential to bleed air from the system to prevent air pockets, which can reduce efficiency and cause uneven heating. Locate the air bleed valves, typically found near radiators or at the highest points of the system, and open them one by one. Allow trapped air to escape until water starts flowing steadily from each valve. Close the valves once the air has been fully purged. This process ensures the system is primed for optimal performance.
Step 6. Inspect for Leaks and Test the Boiler
After completing the refilling and air bleeding process, inspect the system for any signs of leaks. Carefully examine all connections, valves, and pipes to ensure no water escaping. If a leak is identified, tighten the fitting or address the issue before proceeding.
Once you’ve confirmed there are no leaks, turn the boiler back on and allow it to heat up to its normal operating temperature. Monitor the system closely during this time to ensure everything is functioning correctly. Check for consistent heating, proper water pressure, and the absence of unusual noises. If any irregularities are observed, consult the user manual or contact a professional technician to address the problem. This final step ensures your boiler is fully operational and ready for use.
Step 7. Perform Regular Maintenance
To keep your boiler operating efficiently and to extend its lifespan, it is essential to perform regular maintenance. Schedule annual servicing by a qualified technician to inspect and clean critical components such as the heat exchanger, burner, and flue system. Additionally, routinely check the boiler’s pressure and top it up if necessary, as well as bleed radiators to remove trapped air that could affect performance. Regular maintenance prevents potential issues and ensures the system remains safe and energy-efficient over time.
Step 8. Upgrade or Replace When Necessary
Despite regular maintenance, boilers can age and lose efficiency over time. If your boiler is over 10-15 years old or frequently requires repairs, consider upgrading to a newer, more energy-efficient model. Modern boilers often come with advanced features such as programmable thermostats and smart controls that enhance performance and reduce energy consumption. Replacing an outdated boiler improves heating efficiency and can lead to significant energy savings and a reduced carbon footprint. Always consult with a professional to choose the right boiler for your home and heating needs.
Step 9. Monitor Energy Usage
Keeping track of your energy consumption can provide valuable insights into the performance of your boiler system. Sudden spikes in energy usage may indicate inefficiencies or potential issues with the boiler that need addressing. Consider installing a smart energy monitor, which can help you track your usage in real-time and identify patterns that may influence your energy efficiency. You can take proactive steps to maintain optimal performance, reduce costs, and minimize your environmental impact by staying aware of your energy usage.

By following these steps and implementing regular maintenance, you can ensure your boiler operates safely and efficiently for years.
5 Things You Should Avoid
- Skipping the Manufacturer’s Guidelines: Always refer to the Navien user manual before flushing. Ignoring the manufacturer’s instructions can lead to improper procedures and potential damage.
- Using Incorrect Cleaning Solutions: Avoid using harsh chemicals or unapproved cleaning solutions. These can corrode internal components and void the boiler’s warranty.
- Flushing Without Proper Tools: Do not flush the boiler without the necessary tools, such as a proper flushing pump and hoses. Improvising can cause leaks or incomplete flushing.
- Neglecting to Turn Off the Power and Gas Supply: Ensure the boiler is entirely powered down and the gas supply is turned off before beginning. Skipping this step is a significant safety hazard.
- Rushing the Process: Flushing a combi boiler requires patience and attention to detail. Hurrying through the process can result in incomplete descaling, which could lead to performance issues or damage over time.
Conclusion
How to Flush a Navien Combi Boiler is a crucial maintenance task that ensures the system operates efficiently and extends its lifespan.
By following the steps outlined and avoiding common mistakes, you can prevent issues such as blockages and scaling that could compromise performance. Always adhere to the manufacturer’s guidelines, use appropriate tools and cleaning solutions, and prioritize safety.
Regular maintenance, including proper flushing, will keep your boiler running smoothly and effectively for years to come.
About the Author
Adrian Green is a passionate woodworking enthusiast who has dedicated his life to the craft of woodworking. From his early days working alongside his father in the family woodworking shop, Adrian has honed his skills and developed a deep love for creating beautiful, functional pieces with his hands. As the voice behind The Woodenify Blog, he shares his knowledge, tips, and inspiration with fellow woodworkers of all skill levels, helping them build confidence in their abilities while learning new techniques.
Professional Focus
- Specializes in DIY woodworking projects, from furniture making to home décor.
- Provides step-by-step guides, tips, and practical tutorials for woodworkers at any skill level.
- Focused on empowering readers with confidence and knowledge through easy-to-follow instructions and hands-on techniques.
- Passionate about building a community where makers can share, learn, and grow together in the world of woodworking.
Education History
University of Craft and Design – Bachelor of Fine Arts (BFA) in Woodworking and Furniture Design
Woodworking Apprenticeships – Gained extensive hands-on experience through various workshops and mentorships with seasoned craftsmen, refining carpentry and furniture-making skills.
Expertise
- DIY woodworking, carpentry, furniture making, and home décor projects.
- Creating clear, accessible tutorials and guides for beginner to advanced woodworkers.
- Helping readers experience the satisfaction and fulfillment of turning raw materials into stunning finished products.