
Are you tired of constantly adjusting the temperature of your water heater? Do you want more control over your home’s hot water flow? If so, this guide is for you!
How to control a water heater that is already installed can seem like a daunting task, but with the right guidance, it becomes a straightforward process. Proper management of your water heater ensures consistent access to hot water while optimizing energy efficiency and reducing utility costs. Whether it’s adjusting the temperature settings, understanding the control panel, or scheduling maintenance, knowing how to operate your water heater effectively is essential for both convenience and safety.
This guide will walk you through the basics of controlling your installed water heater, helping you make the most of this critical home appliance.
What Are the Benefits of Controlling a Water Heater?
Having control over your water heater provides numerous advantages in terms of comfort and cost savings. Setting the temperature to your desired level allows you to enjoy hot water at just the right temperature for your needs. Whether it’s for showering, washing dishes, or any other household chores requiring hot water, precise control allows you to achieve the perfect balance between warmth and energy conservation.
Additionally, controlling your water heater can save you money on utility bills. Adjusting the temperature settings and scheduling maintenance regularly can optimize its performance and reduce energy consumption. This benefits your wallet and helps minimize environmental impact by conserving energy resources.
What Will You Need?
Before diving into the steps of controlling your water heater, gathering all the necessary tools and materials is essential. Here’s a list of items that will come in handy:
- User manual for your specific model
- Screwdriver
- Thermometer
- Protective gloves
- Cleaning supplies (if needed)
Having these items on hand will make the process smoother and ensure you have everything you need to control your water heater effectively.
10 Easy Steps on How to Control a Water Heater That is Already Installed
Step 1. Turn Off the Power Supply
Always turn off the power supply to your water heater to ensure safety before performing any adjustments. For electric water heaters, locate the circuit breaker connected to the unit and switch it off. If you have a gas-powered water heater, turn the gas valve to the “off” position. This precaution minimizes the risk of electric shock or accidental gas leaks while working on the unit. Additionally, place a warning sign or inform others in the household to avoid turning the power or gas back on during the process.
Step 2. Check the Current Temperature Setting
Before making any adjustments, check the current temperature setting on your water heater. Most water heaters have a temperature dial on the unit—commonly near the thermostat or control panel. A thermometer measures the water temperature by running hot water from a faucet for a minute and collecting it in a container. Compare the measured temperature with the unit’s setting to determine if adjustments are necessary. This step helps you understand your starting point and identify how much the temperature may need to be changed.
Step 3. Adjust the Temperature Setting
To adjust the temperature setting on your water heater, locate the temperature dial, often marked with labels like “Low,” “Hot,” or specific temperature ranges. If your unit has a digital control panel, refer to the user manual for precise
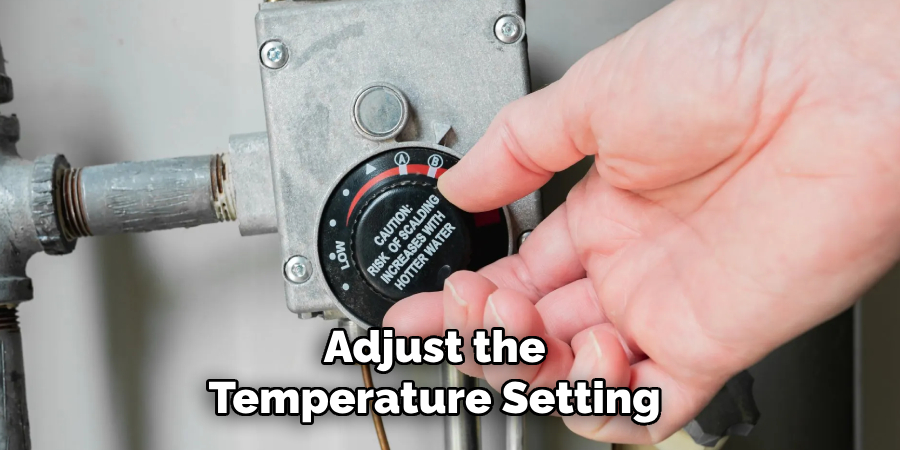
instructions. Turn the dial slightly in the desired direction to increase or decrease the temperature. The recommended water temperature is generally around 120°F (49°C) for safety and energy efficiency. Once you’ve adjusted, wait a few hours and recheck the water temperature to ensure the new setting meets your expectations.
Step 4. Test the Water Temperature Again
After allowing sufficient time for the adjustment to take effect, test the water temperature again. Run hot water from a faucet for a minute, fill a container, and measure the temperature with a thermometer. Ensure the reading aligns with your desired setting. If the temperature is still inaccurate, repeat the adjustment process in small increments until the desired temperature is achieved. Always prioritize safety, avoiding settings above 120°F (49°C) to reduce the risk of scalding.
Step 5. Finalize and Monitor
After achieving the desired water temperature, ensure the thermostat is securely in place, and the water heater is closed correctly. Regularly monitor the water temperature over the next few days to confirm consistency and ensure the settings remain accurate. Periodic checks can help detect any issues early and maintain safe, energy-efficient operations. Keep this guide handy for future reference or adjustments.
Step 6. Perform Regular Maintenance
To ensure your water heater operates efficiently and safely, it is essential to perform regular maintenance. Drain and flush the tank annually to remove sediment buildup that can reduce heating efficiency and potentially damage the unit. Additionally, inspect the anode rod periodically and replace it if it shows significant wear, as this component prevents tank corrosion.
Checking the pressure relief valve for proper functionality is another critical task to avoid pressure-related hazards. Regular maintenance will not only extend the lifespan of your water heater but also help maintain optimal performance and energy efficiency.
Step 7. Adjust the Temperature Settings
Adjusting the water heater’s temperature to an appropriate setting is crucial to conserve energy and prevent scalding. The recommended temperature is typically around 120°F (49°C), which provides sufficient hot water for most households

while reducing energy consumption. Use the thermostat on the unit to adjust, and consider using a thermometer to verify the water temperature at the tap.
Step 8. Insulate the Water Heater and Pipes
Consider insulating your water heater and the surrounding hot water pipes to improve energy efficiency and reduce heat loss. Use an insulating blanket designed for water heaters, ensuring it fits snugly without covering essential components such as the thermostat or pressure relief valve. Wrap the pipes with foam pipe insulation, especially in cold areas where heat loss is more significant.
Step 9. Keep the Area Around the Water Heater Clear
Maintaining a clean and clutter-free area around your water heater is essential for safety and efficiency. Items stored too close to the water heater can obstruct proper airflow, potentially causing the unit to overheat or perform less effectively. Additionally, flammable materials near a gas water heater create a fire hazard, posing a significant risk to your home. Keeping the space clear also allows for easier access during maintenance or inspections, ensuring any issues can be quickly identified and resolved.
To optimize performance and safety, aim for at least two feet of clearance around the entire unit and regularly check the area to prevent the accumulation of debris or items. This simple habit can prolong the life of your water heater and enhance its overall efficiency.
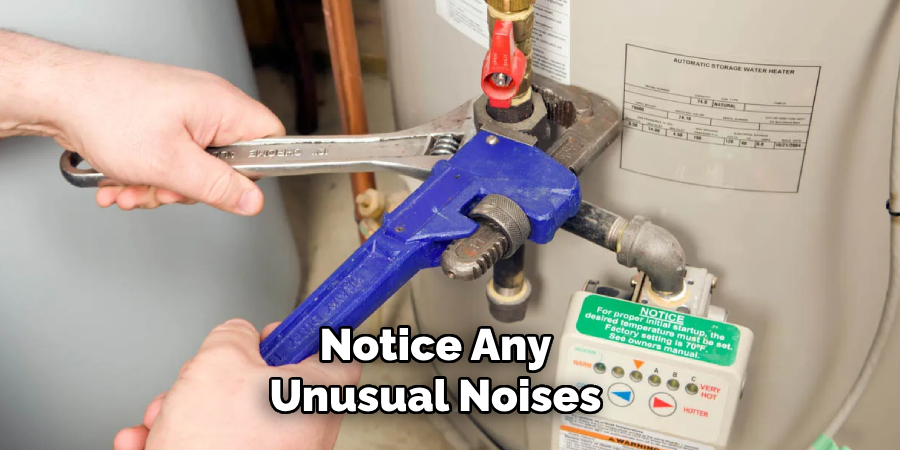
Step 10. Address Any Issues Promptly
If you notice any unusual noises, leaks, or inconsistent hot water supply from your water heater, address them promptly. Delaying repairs can lead to more significant issues and compromise safety and energy efficiency. Regularly inspect your water heater for any signs of damage or malfunctioning components, such as the heating elements or thermostat. If you are not confident in tackling repairs, it is best to call a professional plumber for assistance. With proper maintenance and timely repairs, your water heater can continue providing reliable hot water for years.
By following these simple tips, you can save on your energy bills and contribute to a more sustainable environment.
5 Things You Should Avoid
- Setting the Temperature Too High: Avoid setting the water heater temperature excessively high, which can lead to scalding risks and increased energy consumption. Stick to a safe and recommended temperature, typically around 120°F (49°C).
- Ignoring Regular Maintenance: Skipping routine maintenance, such as flushing the tank or checking for sediment buildup, can reduce the efficiency of your water heater and shorten its lifespan.
- Turning the Heater On and Off Frequently: Constantly switching the water heater on and off can place unnecessary strain on the system, leading to wear and tear over time. Instead, use a timer or thermostat to maintain consistent operation.
- Blocking the Ventilation System: Ensure the ventilation around the water heater is clear and unobstructed. Blocked vents can cause dangerous situations like carbon monoxide buildup in gas-powered units.
- Ignoring Leaks or Unusual Noises: If you notice leaks, rust, or unusual noises from your water heater, do not ignore them. These could be warning signs of significant problems that require immediate attention from a professional.
Conclusion
Properly managing a water heater that has already been installed is essential for ensuring its efficiency, longevity, and safety.
Set the thermostat to an optimal temperature, usually around 120°F (49°C), to balance energy savings and comfort. Regular maintenance should be prioritized by flushing the tank annually and checking for sediment buildup or corrosion. Avoid overloading the system by turning it on and off unnecessarily, and instead, use a timer or thermostat to maintain consistent operation. Additionally, ensure that the surrounding area, especially the ventilation system, is free from obstructions to prevent hazards such as carbon monoxide buildup in gas-powered units. Keep an eye out for any leaks, unusual noises, or signs of rust, as these may indicate the need for immediate professional attention.
By following these steps on how to control a water heater that is already installed, you can maximize the performance of your water heater and avoid costly repairs or replacements.
About the Author
Adrian Green is a passionate woodworking enthusiast who has dedicated his life to the craft of woodworking. From his early days working alongside his father in the family woodworking shop, Adrian has honed his skills and developed a deep love for creating beautiful, functional pieces with his hands. As the voice behind The Woodenify Blog, he shares his knowledge, tips, and inspiration with fellow woodworkers of all skill levels, helping them build confidence in their abilities while learning new techniques.
Professional Focus
- Specializes in DIY woodworking projects, from furniture making to home décor.
- Provides step-by-step guides, tips, and practical tutorials for woodworkers at any skill level.
- Focused on empowering readers with confidence and knowledge through easy-to-follow instructions and hands-on techniques.
- Passionate about building a community where makers can share, learn, and grow together in the world of woodworking.
Education History
University of Craft and Design – Bachelor of Fine Arts (BFA) in Woodworking and Furniture Design
Woodworking Apprenticeships – Gained extensive hands-on experience through various workshops and mentorships with seasoned craftsmen, refining carpentry and furniture-making skills.
Expertise
- DIY woodworking, carpentry, furniture making, and home décor projects.
- Creating clear, accessible tutorials and guides for beginner to advanced woodworkers.
- Helping readers experience the satisfaction and fulfillment of turning raw materials into stunning finished products.